Showing posts with label pinterest. Show all posts

Friday, November 2, 2012

Master Makeover


So I spent all day working on this DIY project. I pinned it on Pinterest last week, and was determined to get it done on my day off. Ever since we upgraded to a king size bed when we moved to Texas 5 years ago, Stephen has missed the look of having a headboard like we had with our queen sleigh bed (which Madeline has now). But a new bed frame was low on our priority list until I saw this inexpensive idea! Time to get started...

Basically you need four 1x6 boards, something to sand them with, some wood stain and 3M tape that holds up to 20lbs. I spent $4 more and got 1x6 boards that snapped into one another. They also had a groove down the center. It didn't take me too long to stain them.

Once they were dry I measured the wall. Found the center and height I needed and stuck them on!


I'm happy with how it turned out. We've also been using low barstools as temporary nightstands. So I also bought some extra wood to make shelves for under the window. Stained them to match the headboard. Yay, I finished it!


I can't remember if I dedicated a post to our other room makeover from last month. We converted our formal dining room into a den with a sitting area and place for our heirloom sewing desk. With some new paint on the walls and some new furniture including a sleeper loveseat and accent chair, it really all tied together. We love how it turned out and get more use out of this space now.


Monday, July 30, 2012

Home Decor Inspiration

For the most part our home is pretty much fully decorated wall wise. Before we moved in we painted the dining, family, kitchen nook, and kids bed rooms. Shortly after we moved in we painted our loft, master bedroom, powder bathroom and arch way. The only walls still white are our kitchen, front entry, stairwell (ugh I hate seeing the kids dirty finger prints all the way up them), upstairs hallway and both upstairs bathrooms. Of course I have an itch to paint them but they will take some work and time since they are a bit more difficult. We also have a lot of art on our walls since I get such a great perk from work. But sometimes I feel like I want to change some out. Or do something creative like this idea above that I saw on Pinterest. It's just a 2x4 painted white with some hooks, would be perfect by our front door (right now I just have a large abstract piece of art there) for the kids to hang their school backpacks. I put one hook in several years ago under our kitchen bar counter for Madeline's backpack, but now that James is starting school this would be perfect! Think this will be my August project.

Today at my work this picture was posted on our Yammer. It's from one of our customers who ordered a photo wall covering for their stairwell. I LOVE how it turned out, great focal point. Now I want to do something like this for our stairwell instead of painting it. 

This isn't really "home decor" but I thought I'd share the pic on this post anyway. So we got a new TV this weekend to replace our 55" that was still under warranty (I think it got zapped from the storm we had several weeks ago). I reorganized our home entertainment shelves and also organized all the cords and plugs. Got this idea from Pinterest too. Saved a bunch of my bread bag ties and used them to label and distinguish which is what cord. I love it!

Wednesday, May 16, 2012

Doilies & Lemons = Inexpensive Décor


I had pinned some decoration ideas for Madeline's First Communion party. I wanted a dainty, girly feeling to tie into the look and theme of her First Communion dress and veil. I thought these doily scrapbook paper mobiles and lemon mason jar floral arrangements were perfect...and inexpensive. I paid about $1 per doily package. And 22 cents per scrapbook paper for the mobiles. For the floral arrangements I bought a bag of lemons for under $2 and 2 bunches of spring flowers from Sam's Club for $7 each. I had everything else I needed. For the mobiles I found bowls with the same circumference as the inner circles of the doilies, used them as a template on my scrapbook paper and cut out perfect circles.

Next I folded 2 doilies in half, then proceeded to tape their edges together along with taping a piece of thread down the center. After I taped both sides I opened each doily and adhered a scrapbook paper circle (I prayed adhesive glue on the back of the circles). And that's it, you're done and ready to hang your mobiles.

I thought they turned out pretty. They would slowly spin. And I love the color pop they gave. I hung them over the cake and food tables.

You can see them here too. I forgot to take closeup pics of my floral arrangements. I like how they turned out too. I love the ideas I can get from Pinterest!

Monday, April 2, 2012

These Thy Gifts: Cake Waffle Ice Cream Sandwiches

I wanted to post about 2 things: James saying prayer before meals and these yummy desserts. So I figured I would just post about both at the same time. Since Stephen has been working mornings now and is home in the evenings to have dinner as a family he's really made a point to talk to the kids about why we should be so thankful to God every time we eat and have food on our plates. If you're Catholic you'll probably recognize the prayer Stephen and the kids say before meals...

{making the sign of the cross}
In the name of the Father, and of the Son and of the Holy Spirit. Amen.
Bless us, O Lord, and these Thy gifts which we are about to receive from Thy bounty, through Christ our Lord. Amen.
{making the sign of the cross}
In the name of the Father, and of the Son and of the Holy Spirit. Amen.

It's so neat to see how my children grow in their faith and at their own pace. Madeline was reciting the Lord's Prayer by the time she was 3 (it's our bedtime prayer). James on the other hand has been really hesitant to say a prayer out loud. He doesn't like being watched or listened to, he's my shy guy. So I've never pushed it, never asked him to repeat it...I just figured he would listen to us pray and when he was ready he would pray too. Well this past year he started to make and say the sign of the cross. He does it at home and at church and when we'll say prayers, but then he remains silent. Well tonight before dinner Stephen was washing up and I already served the kids their dinner. I heard Madeline say to James, "let's pray before we eat without daddy having to remind us..." so they did. And James joined in and said the entire Bless Us Oh Lord prayer, like he's always known it all along. It was sweet for me to hear, and I'm sure even sweeter for our Lord.

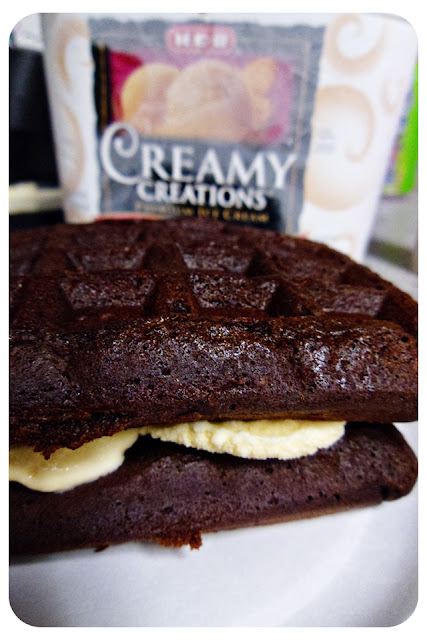
Talking about sweet, check out these desserts I found on Pinterest! That's right, homemade ice cream sandwiches. And so easy to make. Just buy some chocolate cake mix and make the batter according to the directions. Pour the batter onto your waffle maker and let them cook for about 3-5 minutes depending on your waffle maker.

Then put them on a wax paper lined cookie sheet. My cake batter made 12 waffles. Stick them in the freezer to cool and make stiffer. 

Pull your ice cream out to let it soften a little, we love HEB's brand 1905 Vanilla flavor. Then spread it on the waffle and make into a sandwich! That's it!

They were pretty tasty! I had left over cake waffles and tonight instead of making sandwiches I heated up the waffles in a bowl, topped with a scoop of ice cream and drizzled some caramel on it. Tasted like a brownie sundae. Both desserts were scrumptious!

Wednesday, February 22, 2012

Weekly Menu Kitchen Printable


I love being able to make these posts. Tell me, how many of you out there actually feel accomplished once you've made a recipe, craft or idea you pinned on Pinterest? :) Ha ha. Well this project came from compiling a couple ideas and printables I pinned on Pinterest in my "For The Home" pinboard. Now that Stephen is home in the evenings and we are finally having dinner on a regular basis as a family, I wanted to get more organized with my weekly menu and what's for dinner. Usually I would just wing it with the kids, and honestly some nights it would be cereal or breakfast items for dinner. But I'd like us to have more well balanced dinners and I think planning ahead helps. 


So I put my Graphic Design degree to good use and recreated my own weekly menu for my kitchen. I found the royalty free kitchen tool silhouettes on Getty Images. And I got my cute free fonts from Fonts For Peas. I loved the "Be Grateful" and "Just roll with it" quotes I saw on some other printables so I added those to my menu design.


Another tip I got from an idea I pinned was to print the menu out and then frame it behind glass. Then you could write on the glass with a dry erase or wet erase marker. So clever! Wipe away each week to start new! And it helps that I work for a company where I could print my menu and have it framed. I love how it turned out!


So if you would like to use my printable I've loaded the high res jpeg onto my Photobucket album "Free Weekly Menu Printable". Feel free to grab and save it, resize it and print it. I made mine approx 7"x20" to fit my long skinny wall next to my pantry door.


Monday, February 13, 2012

Pretzel Kisses

Aren't these so cute!?


My work is having a Valentines Sweets Potluck tomorrow morning. I was trying to think of something yummy to bring. Awhile back I made these Pretzel Kisses for a baby shower I threw for our neighbor. I made them with the regular milk chocolate kisses. Well I saw these recently on Pinterest using the stripped white chocolate kisses and red and pink M&M's for Valentines. They are super easy to make, the hardest part is unwrapping all the kisses! Place them on pretzels on a cookie sheet with wax paper. Preheat your oven to 200 degrees and stick them in for approx. 3 minutes. You don't want them to melt completely, take them out before the kisses start loosing their shape.

Then press on some M&M's (I couldn't find pink ones, so the red and orange ones from the original mix had to do) and stick them in the refrig to cool and harden. And that's it!

I hope my coworkers like this salty sweet snack!

The past 2 days I've been helping the kids make lots of Valentines with Madeline's scratch'n'sniff cards, and James' 3D sports cards for classmates and neighbors. They passed some out early this evening at church. Tomorrow Madeline's class is having a Valentines party. And Mrs. Kate is taking James and her boys to meet with her mom's group for a Valentines gathering at a local Senior Home. The kids should have a fun Valentines Day. I just picked up some Dollar Tree toys and things for the kids Valentines gifts. And Stephen and I are going simple (or so we agreed) with a card and chocolate so we can spend our money to go out this weekend when my best friend is in town.

I look forward to spending my Valentines at home tomorrow evening with my Ohana. I love my husband. And I love my kids. Nothing could be better than spending time with My Valentines.

Tuesday, January 3, 2012

"Welcome!"

This Christmas I was so thrilled to receive a voucher from work to pick out any art piece I wanted as a thank you for a year's worth of hard work. So I took this opportunity to have something made from 3 ideas: "this family was established...", the birth and anniversary dates idea from Pinterest, and a pineapple symbol for our home that represents the Hawaiian symbolism of hospitality, warmth and friendliness. So I found this pineapple in our awesome inventory of art and I customized it.

So I added our birth dates, 
and then the date this family was "established" 
(our wedding anniversary highlighted in green).

The Hawaiian pineapple motif says to the world: "Welcome!".
So I hung this right by our front door so all of our guests could feel the warmth & friendliness & know they are always welcome in our home.

I had it printed on canvas, gallery wrapped and set in a floater frame.
I love how it turned out!

Friday, December 30, 2011

Look what I made

All my Pinster buddies may recognize this quote from a pin on Pinterest. Well I recreated it with my own design and printed and framed it here at my work. I talk about it in a blog post I wrote for my work's blog here, New Year = Feel Good Art. Please stop by to read it, leave a comment, FB "like" or tweet the post. 

Wednesday, December 28, 2011

Pinterest & TinyPrints


So who is still NOT on Pinterest? Really!? You should be. I love being able to pin ideas from the web onto my virtual pin boards. And I love that when I click on them, they take me right back to the website I  found them on! Awesomeness. So over Christmas we received tons of really cute photo cards from family and friends that used TinyPrints. I loved the quality of these cards, and the layout graphics were what I liked too. So I got to thinking, I couldn't possibly order our Christmas cards through them. With our 105+ mailing list it would just be too expensive. But I could possibly use them for Madeline's First Holy Communion invitations/announcements coming up in a few months. I'm not planning on mailing them out to everyone, just people who are local and could possibly attend and then immediate family. I already started a pin board for Communion dress ideas, so I've added to it with TinyPrints invites too!

So many cute invites!

These are my 2 favorite dresses I've found. I'm going to let Madeline look at all the dresses I've pinned and then pick her favorite. I want something simple, modest and not too many embellishments since she will be wearing my mom's vintage chapel mantilla veil 
(don't want it to clash). 


So all you Pinsters (a.k.a. A pinning gangster), which one of your boards do you seem to add pins to the most?


Sunday, November 6, 2011

Pepperoni Pizza Puffs


These were too yummy and too good not to post about and share. I pinned these on Pinterest and baked them tonight for dinner. These are photos I took of the ones I made and also my recipe (altered a little from the one I used).

  • 1 1/2 cup flour
  • 1 1/2 teaspoon baking powder
  • 2 tablespoon Italian seasoning
  • couple shakes of salt 
  • couple shakes of red pepper flakes 
  • 1 1/2 cup milk
  • 2 eggs, lightly beaten
  • 1 bag (8oz./2 cups) of Italian blend shredded cheese
  • 1 small bag (5oz) mini pepperoni
  • 1/2 cup store-bought pizza sauce
  • ranch dressing
1. Preheat the oven to 375 degrees. Grease a 18 cup muffin pan. In a large bowl, whisk together the flour, baking powder, Italian seasoning, salt and red pepper flakes (if using) ; whisk in the milk and egg. Stir in the cheese and pepperoni; let stand for 10 minutes.


2. Stir the batter and divide among the muffin cups (filling each 3/4 full). Bake until puffed and golden, 20 to 25 minutes.
3. Meanwhile, microwave the pizza sauce until warmed through. Serve the puffs with the pizza sauce or ranch for dipping. 


Mmmmm they smelled SO good baking in the oven. 

I served them with a salad for dinner. They would also be an awesome party appetizer. I will definitely be making these again!